
Frequently Asked Questions
General
For your first billing cycle, we offer Premium Plan at no charge, which allows you to give us a try and see what pricing tier is best for you.
Interested? Get started.
Cardiology
Critical Care
Endocrinology
Family and General Practice
Gastroenterology
Geriatrics
Infectious Disease
Internal Medicine
Neurology
Paediatrics
Palliative Care
Authentication: Agent+ creates a unique ID for every installed version of the app, and requires a PIN for access to the app and associated patient information.
Audit Controls: We maintain a log of who accesses your data, and when they access it.
Encryption: We ensure that all Protected Health Information is kept private and secure, provided by IDENTOS 256 AES Encryption built into the app. This encryption ensures that only you can access your PHI, and that all data stored on your device is protected from external threat.
When adding a referring physician to your app, you need the billing number, not the CPSO number.
Getting Agent+ Ready
• To sign up for an Agent+ account
• Your OHIP Provider (Billing) and CPSO number
• To provide us with Personal and Billing Information
• a Go Secure Account
• a MCEDT Account
• to designate Agent+ to bill on your behalf with the OMHLTC
Note: You will be required to open and close your Internet browser several times during the process of registering for the GO Secure account and enrolling for MC EDT. You can not have other Internet items open at the same time.
Receive letter from the ministry that includes your OHIP Number and information to register for a Go Secure Account
Open a new browser window and copy the link in the ministry letter https://www.edt.health.gov.on.ca
Select “Register Now” to create a GO Secure account.
Close your Internet browser.
Reopen your Internet browser and check your email.
Receive an email with the subject: “GO Secure Login – Registration Confirmation” requesting email confirmation.
Copy the link in the “Registration Confirmation” email into a new browser window.
Confirm your email account by signing in with your GO Secure ID and password.
You have completed the registration for your GO Secure account.
Open your Internet browser and navigate to GO Secure Login screen using the copied link from your ministry letter.
Enroll for MC EDT by signing in with your GO Secure ID and password and use the “Unique Identifiers” provided in the ministry letter.
Confirm the enrolment for MC EDT by selecting the text link indicated on the screen to navigate to the GO Secure Login screen again.
Sign in with your GO Secure ID and password to navigate to the Administration and MOHLTC Services page.
You have completed the enrolment for MC EDT.
In order for Agent+ to bill on your behalf, you must add Agent+ as a designee.
Please ensure you have a GO Secure Account and an MCEDT account. If you do not, or are unsure, please consult our Frequently Asked Questions for more details.
NOTE This process is often easier when completed on a computer or tablet. Send these instructions to yourself for reference on a computer.
If you are having any difficulty, please contact us at 1-647-933-5613 or support@agentplus.ca and we can assist you
To Designate Agent+:
Log in to the Electronic Business Services Enrolment (eBSE) portal at: https://www.ebse.health.gov.on.ca
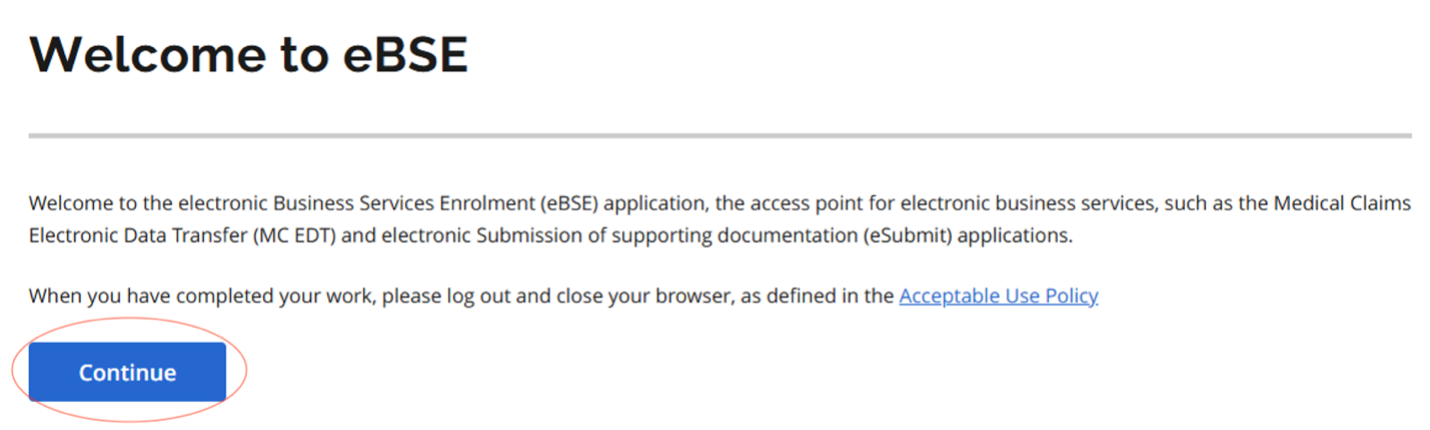
Click “Continue” on the following screen:
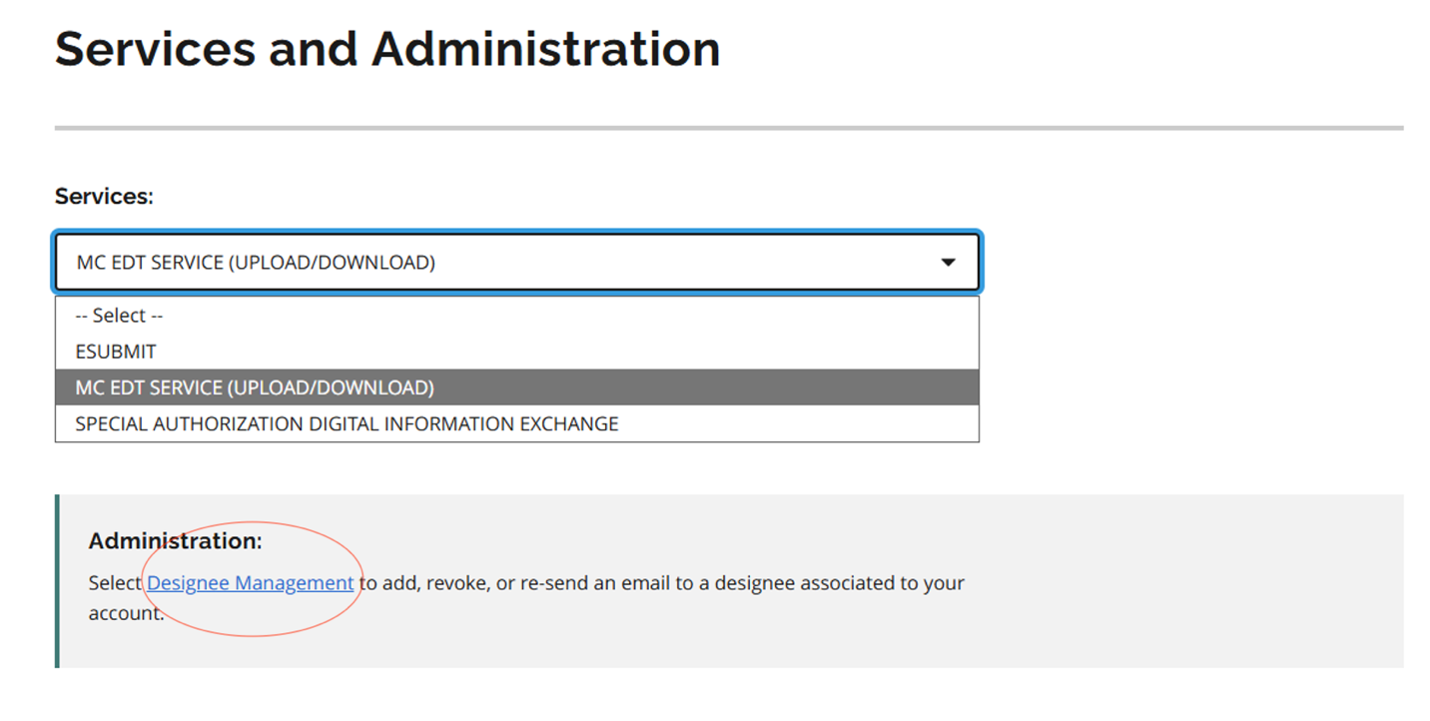
Click “Designee Management” on the following screen:
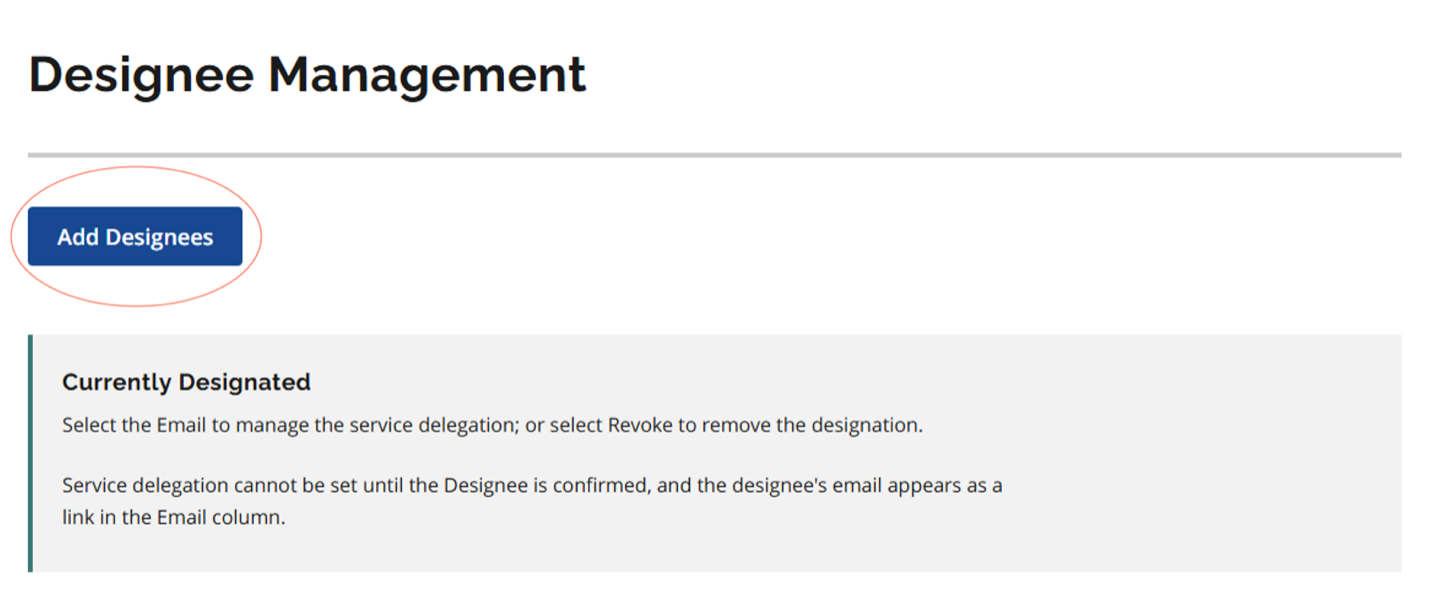
Click “Add Designees” on the following screen:
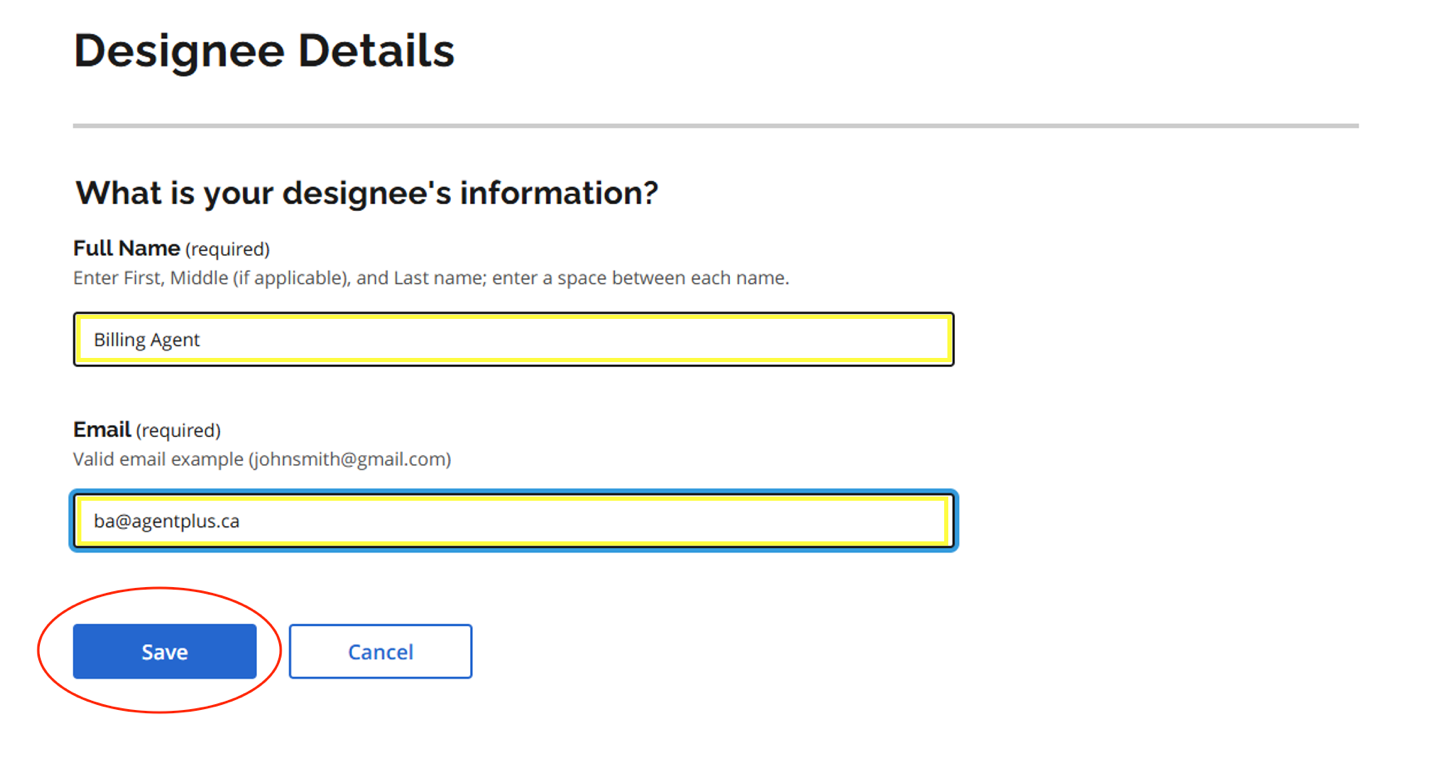
Add Agent+ with the details below, then click save:
Full Name: Billing Agent
Email: ba@agentplus.ca
The following confirmation will appear, click “Designee Management”
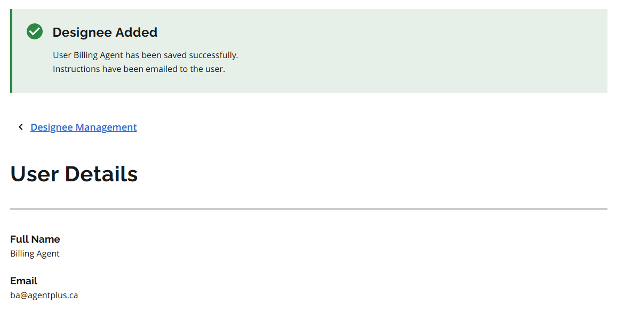
At this point you will have to wait for Agent+ to accept the designation. Once you receive an email confirmation, the email will contain a selectable hyperlink.
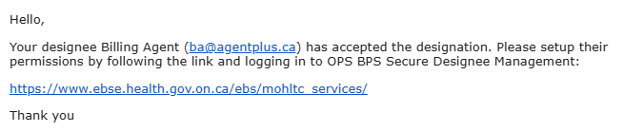
Once Agent+ accepts your designation, you will receive an email from OPS BPS Secure, as follows:
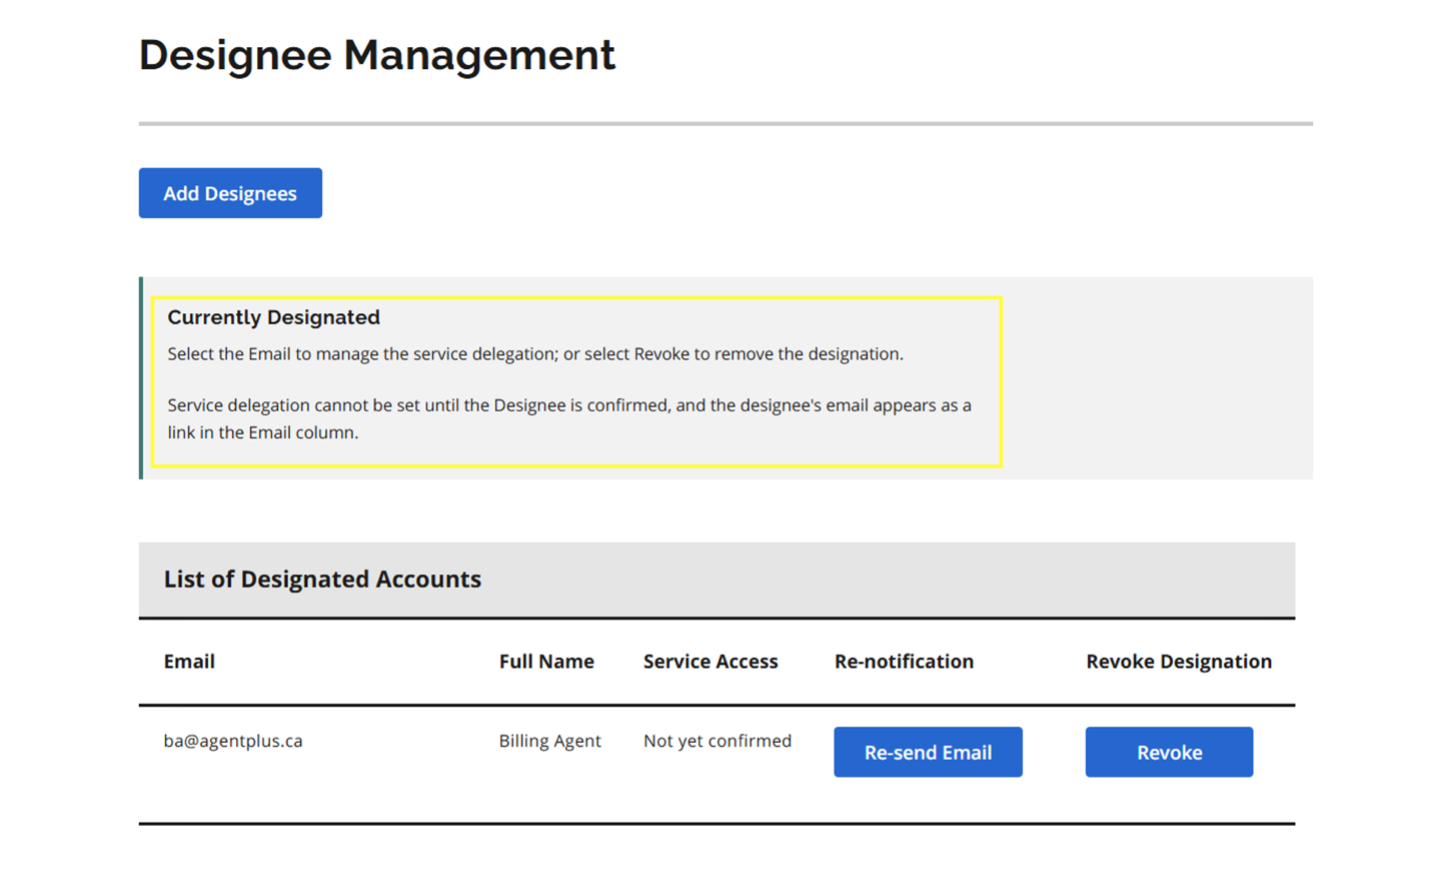
Click the link in the email, log back into the BPS Secure portal, click “Continue” and then “Designee Management” and you will see the following screen indicating Agent Plus has been confirmed as a designee.
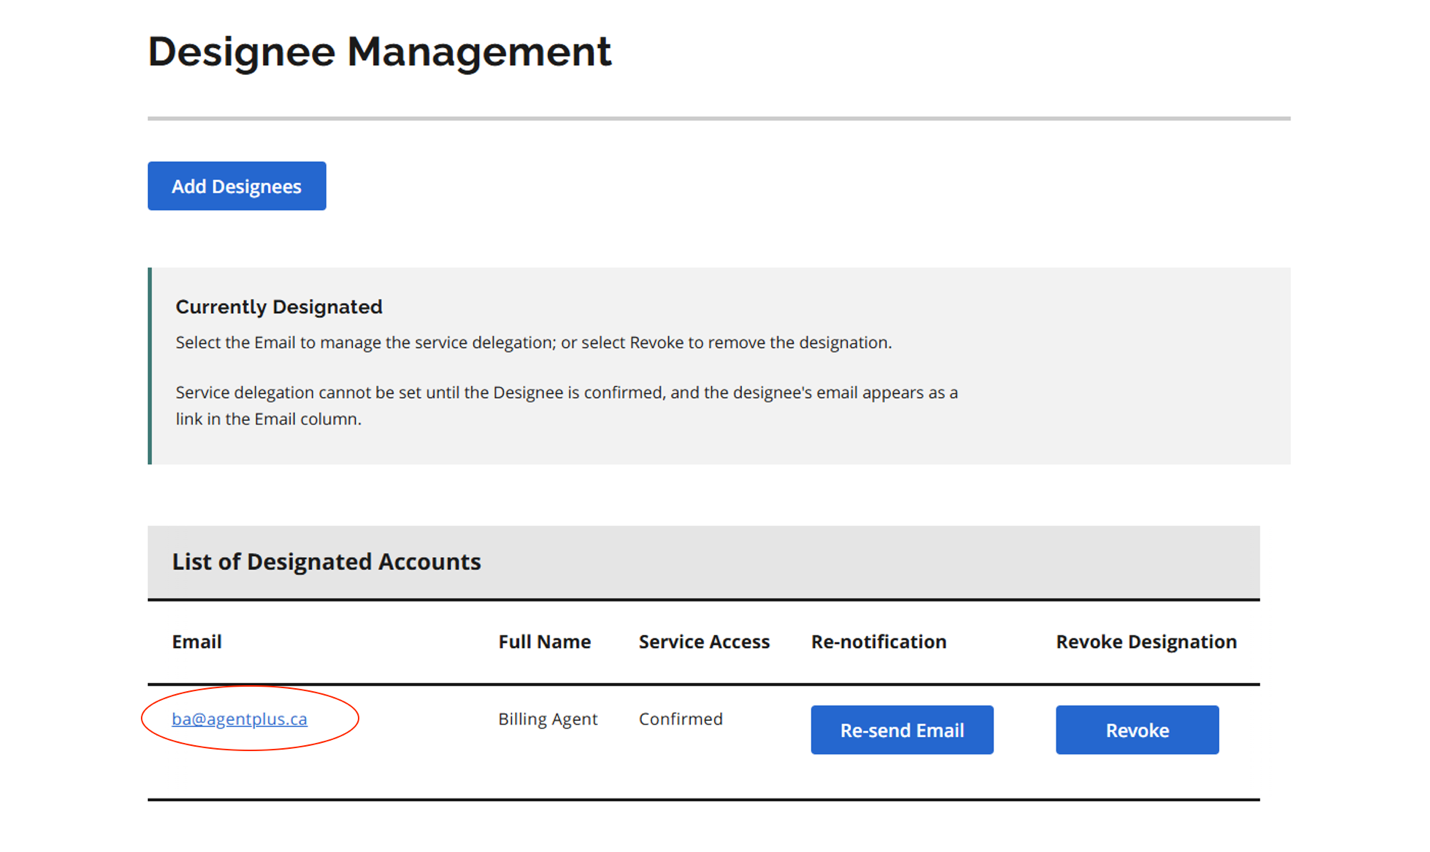
Click the ba@agentplus.ca, on the following screen:
Select “MC EDT Service (UPLOAD/DOWNLOAD)” on the following screen:
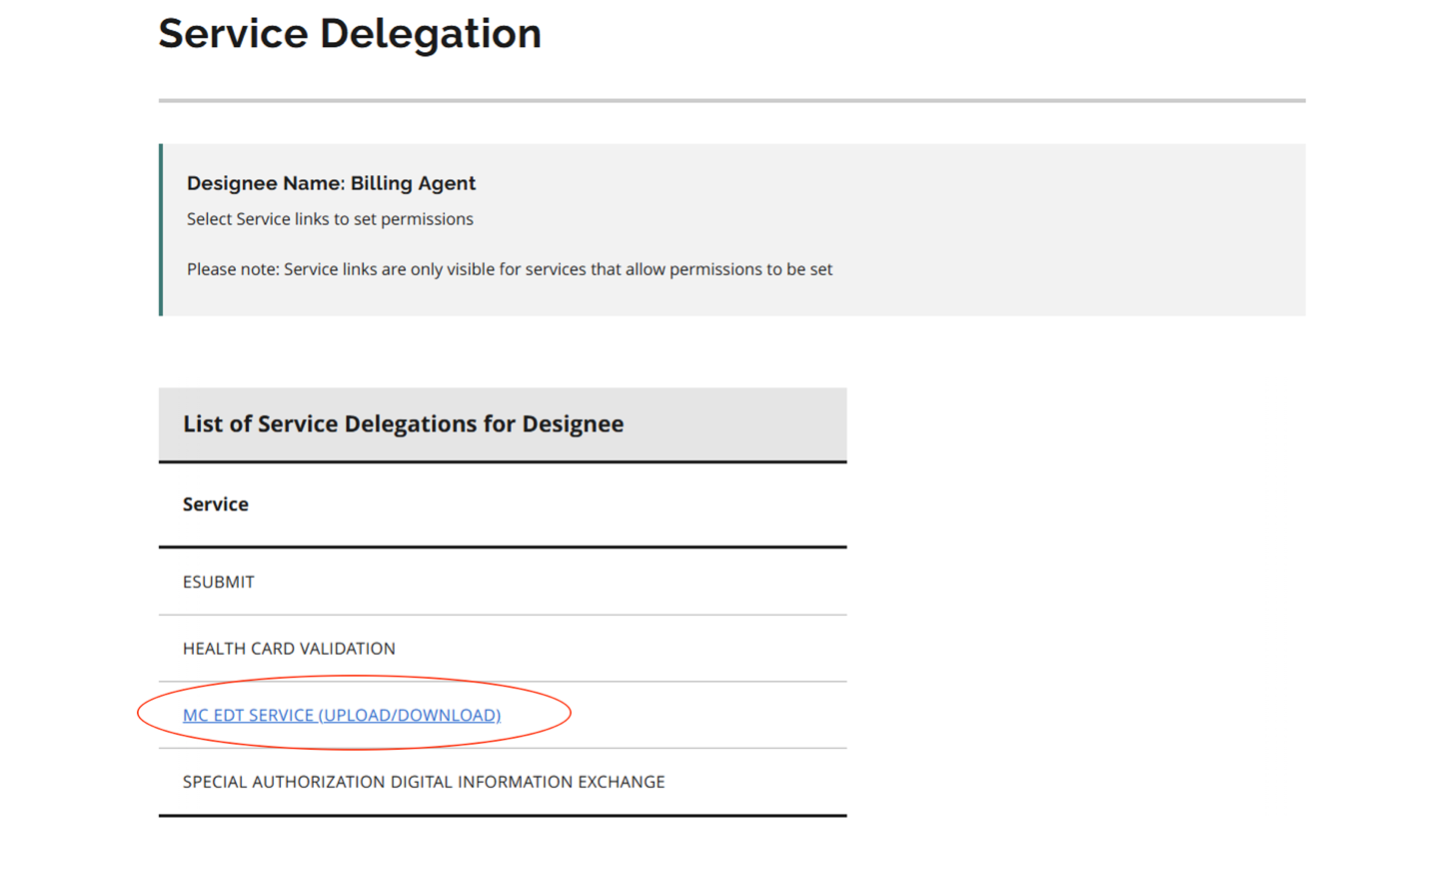
The next step ensures that we can transmit your claims and receive your reports.
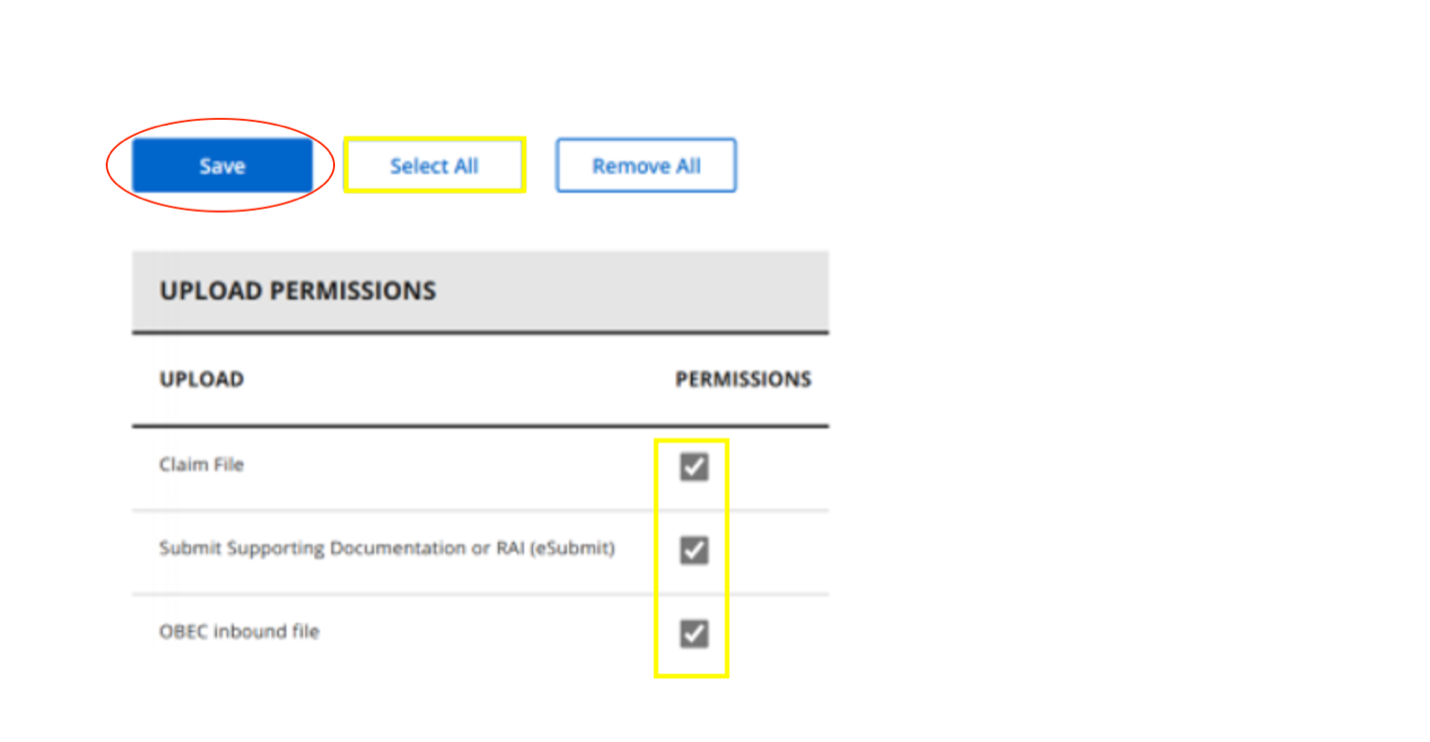
Please ensure you “Select All” and all services have a checkmark. Then click “Save”.
Pricing Plans
For your first billing cycle, we offer Premium Plan at no charge, which allows you to give us a try and see what pricing tier is best for you.
Interested? Get started.
Setting Up Agent+
ServiceOntario INFOline
Toll Free: 1-888-376-5197, 416-314-5518
Mon/Fri 8:30am – 5:00pm
https://www.health.gov.on.ca/en/pro/programs/ohip/claimsoffice/
Using the App
To add a patient to the rounds list, on their visit information screen, turn on the “Rounds Patient” toggle. That patient will automatically appear on your rounds list.
Any claim that has not yet been submitted, can be found in either the In Progress or Ready folder.
Once a claim or Remittance Advice Inquiry is submitted, it will remain in the Submitted folder until Agent+ has received a response from the MOH, when it will be automatically moved to the appropriate folder
A claim that is rejected by the MOH before it has reached your monthly RA is found in the Rejections folder. They can be edited and resubmitted directly from this folder.
A claim that is rejected by the MOH on your monthly RA is in the Partial & non Payments folder. Address these claims by creating an Inquiry and supplying documentation to the MOH directly through the app.
Once a claim has be successfully paid, or written off by you, it can be found in the Resolved folder.
To delete a claim, locate it in the In Progress or Ready folder, then swipe across the claim from right to left. This will reveal a Delete button that you can tap to remove the claim. Note: this action cannot be undone.
1 (647) 933-5613 or ba@agentplus.ca
Do not create a duplicate claim with corrected information.
However, because patient labels have a wide range of different layouts and fonts the scanner will not always be perfectly accurate. We do our best to train the scanner how to read as many labels as possible, however it doesn’t always read perfectly, or doesn’t know how to read a particular layout or font.
Another fast way to enter your patient’s information is to use our health card verification feature. Simply type in the health card number and version code, and the app will populate the patient details after verifying the health card with the Ministry of Health.
Begin by viewing the partial/non-payment, and then tap “Submit Inquiry”. You will see a summary of your original claim information, as well as an empty list of “Codes on Inquiry” and a list of “Service Codes”. The “Service Codes” are the ones originally claimed by you.
Tap to select a service code that you would like to add to the inquiry.
You will be prompted to add further details about that code, including the reason, a place to type an explanation for the inquiry on the code, as well as an opportunity to add documentation by taking a photo of your notes on your phone.
Once you are satisfied with the details about the code, tap Save to add the code to your Remittance Inquiry.
This process can be repeated for as many codes as you want the Ministry of Health to reconsider their payment for.
Once all codes are added to your Remittance Inquiry, tap “Submit” in the top right corner of the screen. Your Inquiry will be sent to the Ministry of Health for review.
Our billing agents are watching for instances when the back end logic isn’t supporting a specific code combination, resulting in the premium showing as worth $0. In this circumstance, our agents will manually adjust the billable amount before submission, so you get paid appropriately.
If you have a specific concern, please contact support@agentplus.ca.
When paid to you, it will appear on your RA labelled as an “Advanced Payment”. Any retraction of advance payments will also be shown on your RA as a “Premium Deduction”.